

A Microsoft 365 data loss prevention policy setup works best when it matches protections to the teams, data, and Microsoft 365 locations they use. Define what sensitive information to detect, decide when to audit, notify, or block, and configure alerts so policy matches can be reviewed and acted on. Then simulate the policies, review results, and tune them before moving to enforcement.
It’s reasonable to want one clear process for spotting risky data activity and responding without disrupting everyday work. The key is to make each policy specific to its purpose: a rule that suits finance may be too restrictive for another team. This guide walks through how to scope policies by team, choose locations such as Exchange, SharePoint, Teams, and Devices, set protections and notifications, and roll out changes in stages. You’ll also see how simulation and ongoing review help keep DLP aligned with the way your business handles information.
Key Takeaways
- Match each policy’s sensitive information rules and protections to the teams and work it covers.
- Choose the Microsoft 365 locations that handle the data, then narrow coverage to the right users or instances.
- Decide whether a policy should audit, notify, encrypt, block, or allow an override based on the risk and workflow.
- Use simulation and policy tips to see how rules affect users before enforcing them across the organization.
- Review alerts and policy matches after deployment, then refine rules as business processes change.
Labels and policies for applying protections to different user scopes
Build each policy around the people handling the data and the activity that needs protection. A clear configuration connects team scope, detection rules, user guidance, and review in one process.
-
Define User Scopes for Labels and Policies
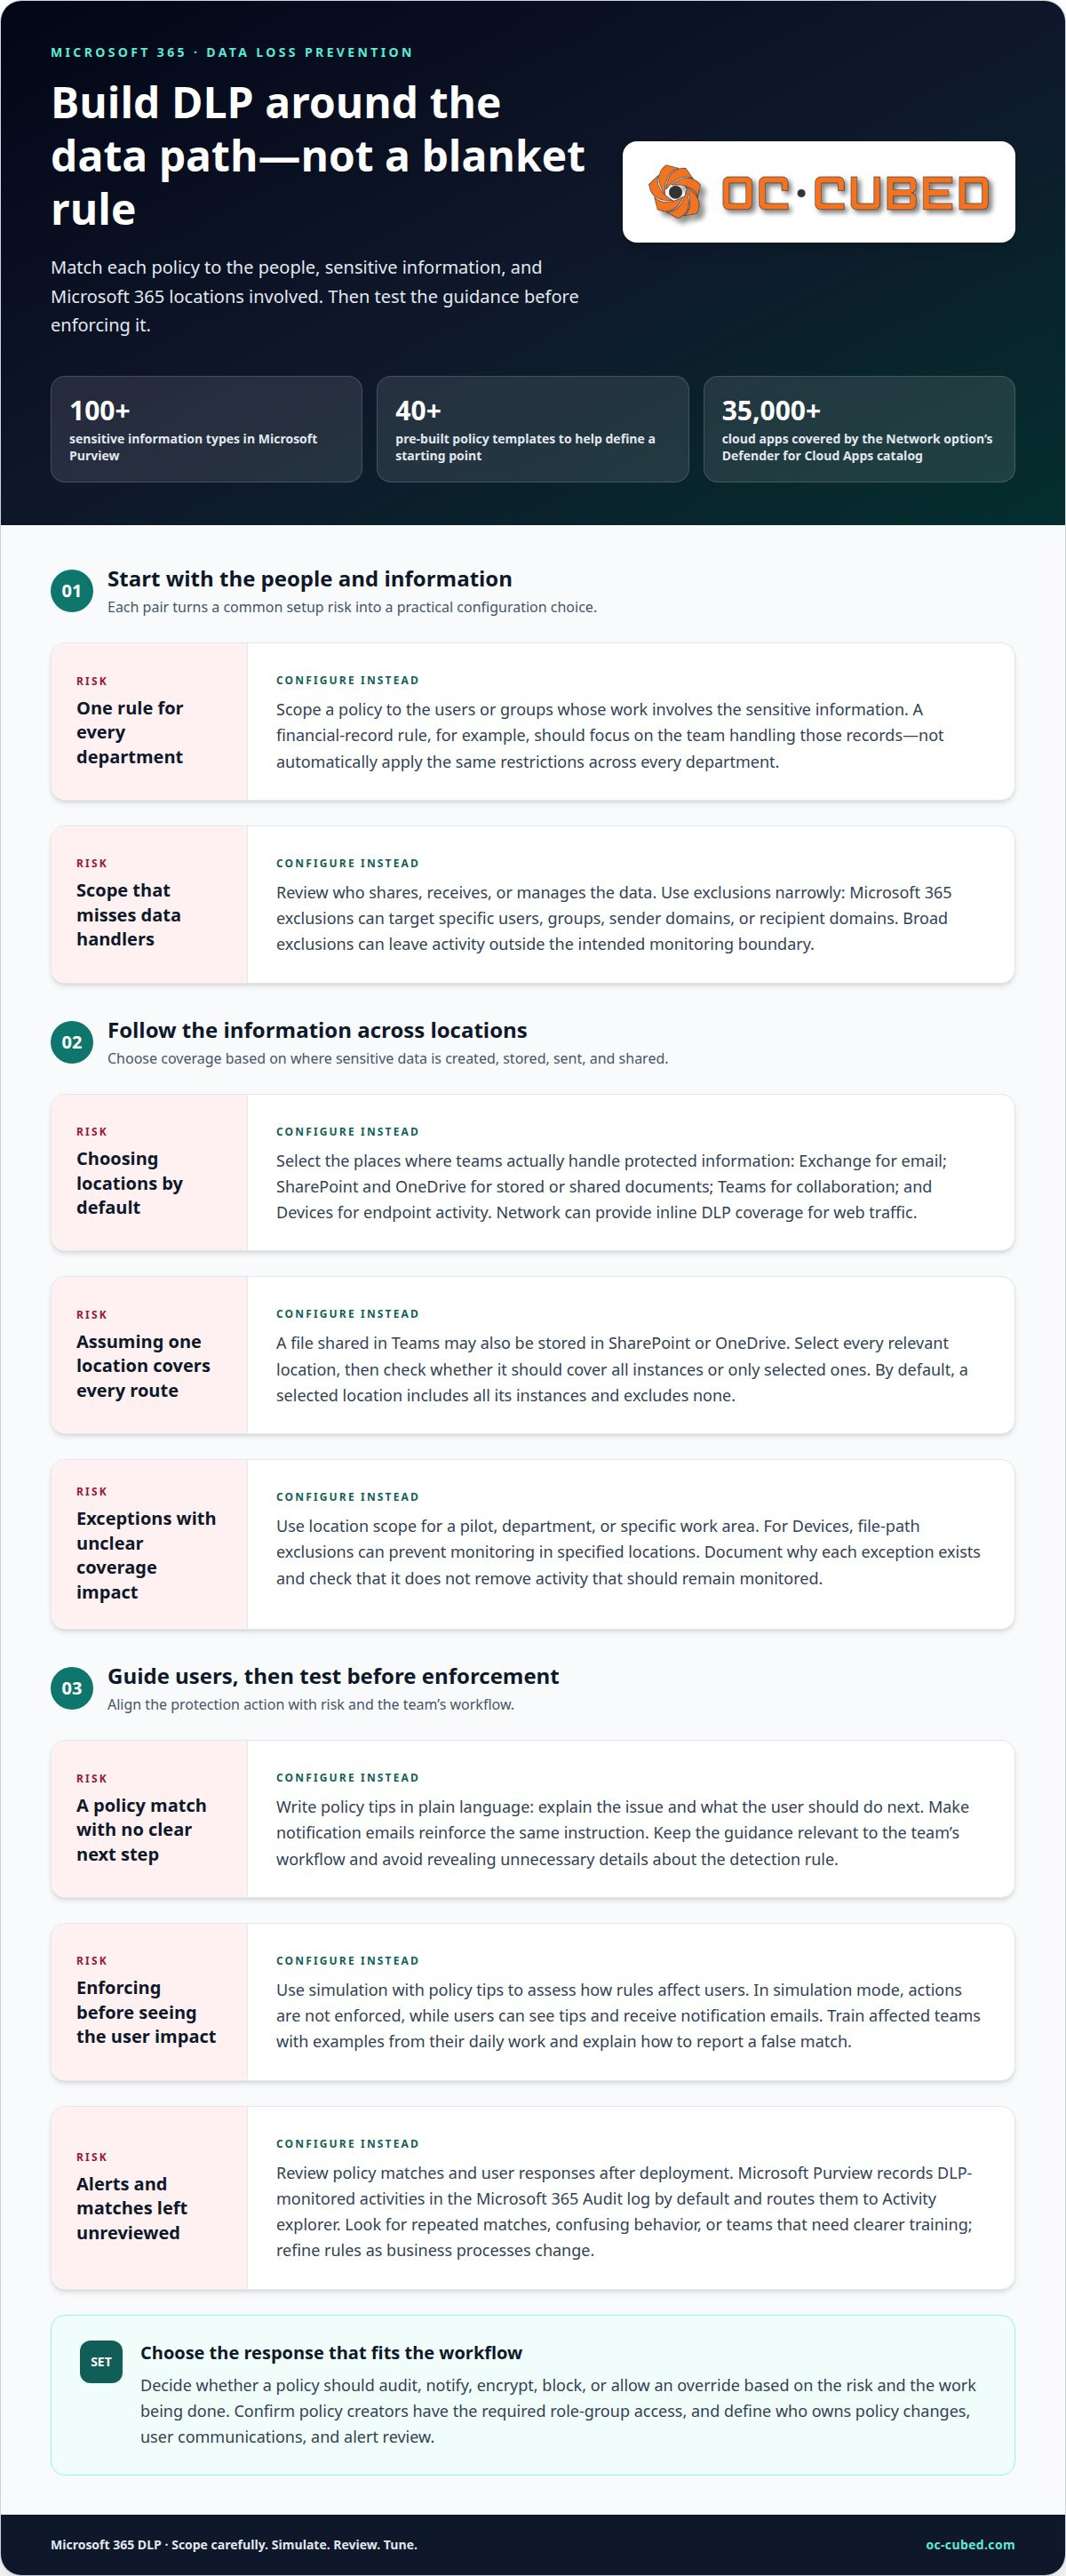
Assign labels and policies to the users or groups whose work involves the sensitive information. For example, scope a policy for financial records to the team handling those records, rather than applying the same restrictions across every department. Microsoft Purview offers more than 100 sensitive information types and 40+ pre-built policy templates, which can help define a starting point.
Review each scope for people who share, receive, or manage the data. Microsoft 365 policy exclusions can target specific users and groups, as well as sender or recipient domains. Use exclusions narrowly; broad exclusions can leave activity outside the intended monitoring boundary.
-
Set Policy Tips and End-User Notifications
Configure policy tips to explain what users should do when a policy matches content. A useful tip names the issue in plain language, such as a document containing sensitive information, and gives a clear next step. Check that the message fits the team’s workflow and doesn’t reveal unnecessary details about the detection rule.
Set notification emails to reinforce the same instruction, not introduce a conflicting one. In simulation mode with policy tips, actions aren’t enforced, but users can see tips and receive notification emails. This lets teams assess the guidance before policy enforcement changes user activity.
- Train each affected team using examples from its daily work. Show staff what a policy tip looks like in a message or document, what action it recommends, and how to report a false match. For example, a finance team may need guidance on handling a flagged spreadsheet, while another team may encounter the rule in a shared document. Use the examples to clarify expected behavior and why the policy applies.
- Monitor policy matches and user responses after configuration. Microsoft Purview records DLP-monitored activities in the Microsoft 365 Audit log by default and routes them to Activity explorer. Use that record to identify repeated matches, confusing user behavior, or teams that need clearer training. A pattern of users encountering the same tip can point to a rule or instruction that needs review.
- Confirm that policy creators have the required role-group access before deployment. Eligible groups include Compliance administrator, Compliance data administrator, Information Protection, Information Protection Admin, and Security administrator. Align permissions with each person’s responsibilities, and document who owns policy changes, user communications, and alert review. This gives teams a clear path to raise questions and helps maintain consistent configuration.
Choosing Microsoft 365 locations for policy coverage
Start by matching each location to where teams store, send, or share sensitive data. Microsoft 365 DLP coverage depends on selected locations and eligible licensing; this guide focuses on Microsoft 365 Business SKU and also applies to Azure Information Protection Plan 1.
-
Select Microsoft 365 and Other Protected Locations
Select the locations where sensitive information is created or handled. Microsoft Purview DLP can cover Exchange, SharePoint in Microsoft 365, Teams, and Devices. Microsoft 365 policies can also protect data across OneDrive. For activity on endpoints, include Devices when coverage needs to extend beyond emails and cloud documents.
For web traffic, consider the Network option for inline DLP. It can cover more than 35,000 cloud apps in the Microsoft Defender for Cloud Apps catalog. Choose locations based on actual data flows, not simply because an application is available. This keeps compliance controls focused on the places where protected information moves.
-
Set Location Scope and Include or Exclude Options
Choose whether each location applies broadly or only to selected instances. By default, selecting a location includes all its instances and excludes none. Narrow the scope when a pilot, department, or specific work area needs a separate policy. Review exclusions carefully to avoid removing activity that should remain monitored.
Microsoft 365 DLP exclusions can target recipient domains, sender domains, specific users, or groups. For Devices, file path exclusions can prevent policies from monitoring files in specified locations. Decide what each exception means for coverage before adding it, and document the business reason alongside the configuration.
-
Configure Policies for Exchange, SharePoint, OneDrive, and Teams
Create a custom policy and select locations that match the information flow. For example, choose Exchange for email, SharePoint and OneDrive for stored or shared documents, and Teams for collaboration activity. A policy can cover multiple locations, but align its conditions and actions with the relevant workflows.
To configure coverage, open the Microsoft Purview Compliance Portal, create or select a policy, then choose locations and their scope. Check whether each location should include all instances or selected ones. Don’t assume one location covers every route: a file shared in Teams may also be stored in SharePoint or OneDrive.
- Review licensing before enabling the selected features. DLP capabilities depend on the Microsoft 365 subscription and features in use; additional costs depend on the plan and the coverage selected. There isn’t one universal location limit to apply to every organization, so design scope around the subscription and the data paths the policy must protect.
For support aligning Microsoft 365 locations with tenant configuration, explore Microsoft 365 configuration support as part of a practical coverage plan.
DLP policies that encrypt or block messages and documents with sensitive content
Microsoft Information Protection offers over 100 types of sensitive information, including United States personally identifiable information. Select an available type or define a custom identifier before choosing how the policy should respond.
-
Identify and Classify Sensitive Data
Define what counts as sensitive content before setting an action. Start with the information type that matches the data, then decide where the policy should detect it and which users or locations need coverage. For example, a policy can detect sensitive information in an email or document and apply controls automatically when its conditions match.
Classification affects what happens next. A rule designed for highly sensitive items may block sharing, while a lower-risk match may only be audited. Keep the detection condition specific enough to avoid catching unrelated content, and consider how staff work with files on devices and in Microsoft 365.
-
Review Sensitive Information Types and Data Identifiers
Choose a built-in sensitive information type that fits the data, such as United States personally identifiable information. Microsoft 365 also provides templates for information covered by the Health Insurance Portability and Accountability Act of 1996, the Gramm-Leach-Bliley Act, and the Payment Card Industry Data Security Standard. Use the closest match, rather than treating every identifier as equally sensitive.
If built-in types don’t match an organization’s data, create a custom sensitive information type. For example, the pattern AB\d{8} can detect values formatted like an account number. Custom types can use confidence levels, which help set how strongly detected content must match before a policy acts. Test the pattern against representative content before enforcing controls.
-
Apply Encryption or Blocking Actions
Choose an action that matches the data security risk. Microsoft 365 DLP policies can automatically apply encryption or block delivery of messages and documents when sensitive content is detected. A block without override stops sharing; block with override prevents the activity by default but lets users proceed and provide a reason.
For sensitive items at rest, consider restricting access to stored content through an appropriate protective action. Use this when the goal is to control access to stored content. Match the action to the policy’s purpose, and account for legitimate workflows before applying a restrictive response across users or devices.
- Audit policy activity so detection and enforcement remain visible. Microsoft Purview records DLP-monitored activities in the Microsoft 365 Audit log by default and routes them to Activity explorer. Review matches to understand which sensitive information types triggered, where the activity occurred, and whether the selected action fits the situation. Use those findings to refine conditions or response settings.
Separate detection from response during configuration. A policy can identify sensitive content without immediately blocking it, allowing administrators to review matches first. For example, monitor a custom account-number pattern in documents, assess whether it identifies the intended data, then apply encryption or blocking once the rule is accurate.
Setting policy tips, notifications, and blocking actions
Set user guidance and enforcement together so each policy match leads to a clear, consistent response. Choose actions based on the activity’s risk and its effect on daily work.
-
Set Policy Tips and User Notifications
In Microsoft Purview, edit the policy’s user notifications and policy tips alongside its conditions and actions. A policy tip can explain why an action was restricted and what the user should do next. Keep the wording direct, such as asking someone to use an approved sharing method for a document containing sensitive data.
Check that notification emails reinforce the same instruction and avoid revealing unnecessary details about detection conditions. During simulation with policy tips, Microsoft Purview can show tips and send notification emails without enforcing policy actions. This lets the team review how users understand the message before restrictions take effect.
-
Apply Blocking Actions and Protections
Choose an action that matches the activity’s risk. The Block action prevents the user activity in all circumstances. Block with override stops the activity by default but lets the user proceed after providing a reason. This option can support legitimate work while recording why a user chose to continue.
For example, a credit card data rule might block an email from being sent externally. Use an override only when a documented business need justifies proceeding. If the risk requires an absolute restriction, select Block without override instead. Make the distinction clear in both policy configuration and user guidance.
- Match the action to the location as well as the content. Microsoft Purview’s Allow action is available only for DLP policies scoped to Devices. Device policies can be configured to audit, block, or block with override activities on Windows devices. Don’t assume an action available for Devices will also appear for Exchange, SharePoint, or another location.
- Set notifications so the next step is clear. For an audit-only match, the user may need a brief explanation without a block message. For a blocked message, explain that the content matched a policy and describe an appropriate alternative, such as removing sensitive data or using an approved channel. Keep the explanation consistent with the selected action.
- Review policy tips and enforcement as separate controls. A tip informs users, while a blocking action prevents activity or permits a reasoned override. Test representative scenarios, such as sending a message with sensitive data, and confirm that the correct tip and action appear together. This can catch confusing guidance before restrictive controls affect routine work.
Simulation, deployment, and policy tuning
A careful Microsoft 365 data loss prevention policy setup begins with review, not enforcement. Keep a new Microsoft Purview policy off while its scope, conditions, and actions are being developed.
-
Create a DLP Policy in the Microsoft Purview Portal
Open the Microsoft Purview Compliance Portal and create a DLP policy. Choose a template or custom policy, then configure its locations, conditions, and actions for the data flow it should protect. Keep enforcement off while developing and reviewing the policy. Check the selected scope before testing, especially if it covers sharing across OneDrive, Exchange, or SharePoint.
-
Simulate and Deploy the Policy
Run the policy in simulation mode and review its reports before enforcement. Simulation audits events without applying policy actions, so users can continue sending or sharing content. Microsoft 365 test mode also flags policy matches without preventing content from being sent. If simulation includes policy tips, narrow the policy to a pilot group to assess the effect on users.
Deploy in stages, moving from simulation toward enforcement. Microsoft recommends starting device policies with Allow and policies for other locations with Audit only, then moving to more restrictive actions. For policies controlling data transmission between internal tenants, deploy the policy in both source tenants.
-
Tune the Policy and Review Deployment Risks
Compare simulation matches with the types of data the policy should detect. If a rule flags routine OneDrive files, refine its conditions or scope before enabling a block. If expected activity produces no match, review the detection criteria and covered locations. Don’t treat every match as a failure; determine whether it identifies information that needs protection.
- Review policy reports and Activity explorer to identify patterns in detected activity. Check whether unexpected matches cluster around a location, sharing action, or team workflow. Adjust the relevant conditions or exclusions, then simulate again. This review can reveal disruptive rules before they affect routine work and help distinguish a narrow configuration issue from a broader policy problem.
- Revisit the Microsoft 365 data loss prevention policy setup as business processes and protection needs evolve. A changed sharing workflow or new way of storing files can affect whether existing coverage still fits. Record the reason for policy changes, simulate revised rules, and confirm they continue to protect the intended information. Regular review keeps policy decisions aligned with actual business activity.
OC Cubed - Your trusted MSP: Microsoft 365 Tenant Maintenance
OC Cubed - Your trusted MSP provides Microsoft 365 Tenant Maintenance to help businesses keep their environment managed as policies and workflows evolve. Turn to this support when DLP rules need to fit changing Microsoft 365 use, or when policy reviews and tenant maintenance compete with day-to-day IT priorities.
For a policy that affects access or sharing, coordinated maintenance can help keep settings aligned with how teams work. Remote IT Support can also help address user issues that arise as new controls are introduced. Security Threat Detection and Remediation and Endpoint Protection / Antivirus support broader protection alongside Microsoft 365 safeguards.
Contact OC Cubed - Your trusted MSP to discuss Microsoft 365 Tenant Maintenance for your environment.
Make DLP a shared responsibility
A policy works best when someone owns its decisions after launch. Assign responsibility for reviewing policy changes, interpreting alerts, and coordinating with teams whose work may be affected. That ownership gives Microsoft 365 data loss prevention policy setup a clear path beyond initial configuration, without leaving important decisions buried in routine IT tasks.
OC Cubed - Your trusted MSP can support this work through Microsoft 365 Tenant Maintenance, Remote IT Support, and Security Threat Detection and Remediation. Bring in support when policy administration, user issues, or security review need to fit into a broader IT plan. The goal is a practical operating process that stays aligned with how your organization handles information.
Take the next step by establishing clear ownership and a DLP program your teams can work with.
Frequently Asked Questions
How does a unified alerting and remediation system work in Data Loss Prevention?
A unified DLP workflow connects a detected match with investigation and response. For example, an alert can direct reviewers to a message or file event, while Activity explorer helps show what happened. Reviewers can assess whether the match reflects risky activity, then use the policy’s configured controls or adjust how it is handled. Assign clear ownership for reviewing alerts so important activity receives consistent attention.
How to choose sensitive information types and policy conditions for Microsoft 365 DLP?
Choose a sensitive information type that reflects the data your policy should protect, then pair it with conditions suited to the use case. For a custom identifier, set confidence levels to distinguish stronger matches from less certain ones. Test the condition against examples of the intended data and similar ordinary content. Comparing the results helps reveal whether the policy detects the right information without treating unrelated material as sensitive.
How do DLP policy rules, actions, exceptions, and priority work?
A rule matches its conditions, then applies its configured action. Exceptions narrow where a rule applies, while policy priority determines which policy takes precedence when several could match. Reordering policies changes priority without changing their rules, conditions, or actions. Renaming a policy doesn’t change names already recorded in existing events or audit records, though new records use the updated name.
How to test a Microsoft 365 DLP policy in simulation mode before enforcing it?
Run the policy in simulation, then compare its reports with test scenarios that reflect real work, such as sharing a document or sending an email. Confirm which rules match and whether the resulting events fit the intended scope. Simulation audits activity without enforcing actions, so use the findings to refine conditions before deployment. Reviewers can also use Activity explorer to examine recorded activity and investigate unexpected matches.
What Microsoft 365 licenses include Data Loss Prevention (DLP)?
The guide focuses on the Microsoft 365 Business SKU and also applies to Azure Information Protection Plan 1.
What are the default sensitive information types and supported U.S. data identifiers in Microsoft 365 DLP?
Microsoft Information Protection offers over 100 sensitive information types, including United States personally identifiable information. A custom type can use the pattern AB\d{8} to detect account-number-style data.

Article by
Peter Irizarry
Peter Irizarry founded OC Cubed, LLC in 2023 to help small to mid-sized businesses stop worrying about downtime and cybersecurity threats. A frequent speaker on SMB digital transformation, Peter is passionate about translating complex IT roadmaps into plain-English business growth strategies. He resides in North Texas with his family.


